
15 Event Card Design Tips: Create Stunning Invitations That Get RSVPs

Creating a memorable event card requires more than just putting together basic information. Your event card serves as the first impression and sets the tone for what guests can expect. From weddings to corporate gatherings every detail matters in capturing attention and conveying the right message.

When you’re designing an event card you’ll need to consider various elements including typography color schemes and layout composition. These components work together to create a cohesive design that reflects the event’s purpose and style. Whether you’re aiming for elegant sophistication or modern minimalism your design choices will influence how potential attendees perceive and respond to your invitation.

Understanding Event Card Design Fundamentals

Event card design combines strategic visual elements with purposeful composition to create impactful invitations. The foundational aspects of card design determine how effectively your message reaches its intended audience.

Key Elements of an Event Card

  • Typography: Select 2-3 complementary fonts that enhance readability at varying sizes
  • Color Palette: Use 3-4 coordinated colors that align with the event’s theme
  • Visual Hierarchy: Position essential information (date, time, location) in order of importance
  • White Space: Maintain 15-20% empty space to prevent visual clutter
  • Image Selection: Include high-resolution graphics at 300 DPI minimum
  • Paper Quality: Choose stock between 80-100 lb weight for optimal durability

Design Principles for Event Cards

  1. Balance
  • Center alignment for formal events
  • Asymmetrical layouts for modern gatherings
  • Equal distribution of visual weight across the card
  1. Contrast
  • 70% difference between background & text colors
  • Varied font sizes (18pt headlines, 12pt body text)
  • Distinct separation between design elements
  1. Unity
  • Consistent spacing (0.25″ margins minimum)
  • Repeated design motifs throughout
  • Matching color schemes on front & back
  1. Emphasis
  • Primary information scaled 30% larger
  • Strategic use of bold or italicized text
  • Focal points placed at optical centers
Design Element Standard Dimensions Recommended Specs
Card Size 5″ x 7″ Portrait orientation
Margins 0.25″ – 0.5″ All sides
Font Size 10pt – 18pt Title: 16-18pt, Body: 10-12pt
Resolution 300 DPI CMYK color mode

Choosing the Right Color Schemes

Color selection forms the foundation of effective event card design, establishing the emotional connection with recipients while conveying the event’s purpose. The strategic use of colors influences perception, sets the mood, and guides visual attention across the invitation’s elements.

Color Psychology for Events

Color meanings evoke specific emotional responses in event card design:

  • White represents purity and elegance – ideal for weddings and formal galas
  • Blue conveys trust and professionalism – perfect for corporate events
  • Red signifies energy and excitement – suited for celebrations and festivals
  • Green suggests growth and harmony – appropriate for outdoor and eco-friendly events
  • Purple communicates luxury and creativity – effective for high-end gatherings
  • Black projects sophistication and exclusivity – works for black-tie affairs

Creating Visual Hierarchy Through Color

  • Use darker shades for primary text elements like event names and dates
  • Apply brighter hues to highlight key details such as venue locations and RSVP instructions
  • Incorporate complementary colors to separate different information sections
  • Maintain 60-30-10 color distribution:
  • 60% dominant color for backgrounds
  • 30% secondary color for supporting elements
  • 10% accent color for calls-to-action
Color Purpose Recommended Contrast Ratio Example Usage
Primary Text 4.5:1 minimum Event title, date
Secondary Text 3:1 minimum Location details
Decorative Elements 2:1 minimum Borders, patterns

Typography Best Practices

Typography forms the foundation of effective event card design, serving as a crucial element in conveying information and establishing the event’s tone.

Font Selection and Pairing

Select fonts that align with your event’s character while maintaining legibility. Pair a maximum of 2-3 complementary typefaces:

  • Display fonts (Didot, Baskerville) for titles capture attention
  • Sans-serif fonts (Helvetica, Futura) for modern events enhance readability
  • Serif fonts (Garamond, Caslon) for formal occasions add elegance
  • Script fonts (Copperplate, Snell Roundhand) for wedding invitations create sophistication

Font combinations to consider:

Primary Font Secondary Font Event Type
Didot Futura Gala Events
Baskerville Helvetica Corporate Functions
Copperplate Garamond Formal Weddings
Brandon Grotesque Montserrat Modern Celebrations

Text Hierarchy and Readability

Create clear visual hierarchy through strategic text formatting:

  • Headlines: 24-32pt font size for event names
  • Subheadings: 18-24pt font size for date time location
  • Body text: 10-12pt font size for additional details
  • Line spacing: 120-150% of font size ensures optimal readability
  • Text alignment: Center alignment for formal cards left alignment for modern designs
  • Contrast ratios: 4.5:1 minimum for body text 7:1 for small text
Element Specification
Letter spacing 0.5-1.5px for headlines
Word spacing 0.25-0.5em for body text
Margin 0.75-1 inch from card edges
Paragraph spacing 1.5x the line height

Visual Elements and Graphics

Visual elements transform event cards from simple text documents into engaging invitations that capture attention. These design components establish the event’s aesthetic while conveying essential information through a balanced mix of graphics text.

Icons and Illustrations

Event card illustrations enhance communication through simple yet impactful visual elements:

  • Select icons that match the event theme – champagne glasses for celebrations ornate flourishes for formal occasions
  • Use vector graphics to maintain quality across different sizes print formats
  • Incorporate line weights between 0.25pt 2pt for optimal visibility reproduction
  • Place decorative elements symmetrically to frame key information create visual flow
  • Limit illustrations to 2-3 key elements preventing visual clutter maintaining focus
  • Choose monochromatic or complementary color schemes for icons maintaining design cohesion

Photography and Image Placement

Image Specifications Requirements
Resolution 300 DPI minimum
Color Mode CMYK for print
Safe Zone 0.125″ from edges
File Format High-res JPEG TIFF
  • Position feature images in the top third of the card drawing immediate attention
  • Maintain 60% image 40% text ratio for balanced composition
  • Add subtle vignettes or overlays to improve text legibility over photos
  • Create focal points through asymmetrical image placement negative space
  • Use high-contrast photos that align with the color palette theme
  • Scale images proportionally avoiding stretching distortion
  • Apply consistent photo treatments filters across all visual elements

Digital vs Print Event Cards

Digital and print event cards require distinct design approaches due to their unique display environments and user interaction methods. Each medium presents specific opportunities and limitations for creating impactful invitations.

Designing for Different Mediums

Digital event cards accommodate dynamic elements with RGB color spaces at 72 DPI resolution. Print cards demand CMYK colors at 300 DPI with 1/8 inch bleeds for professional printing. Here’s a comparison of design specifications:

Design Element Digital Cards Print Cards
Resolution 72 DPI 300 DPI
Color Space RGB CMYK
Safe Zone 20px margin 1/4 inch margin
File Format PNG, JPG, GIF PDF, AI, PSD
Typography Size 14-16px body text 10-12pt body text

Interactive Design Elements

Digital event cards transform static designs into engaging experiences through:

  • Animated transitions between card sections
  • Clickable RSVP buttons with instant response tracking
  • Expandable sections revealing additional event details
  • Video elements showcasing venue tours or event previews
  • Live countdown timers to event dates
  • Interactive maps with venue directions
  • Social media integration for sharing capabilities
  • Dynamic QR codes linking to event websites
  • Embossed textures highlighting key design elements
  • Metallic foil accents emphasizing formal details
  • Die-cut patterns creating dimensional effects
  • Spot UV coating adding selective shine
  • Letterpress impressions providing depth
  • Custom paper stocks enhancing visual impact

Event Card Templates and Tools

Event card creation becomes streamlined with professional design tools software solutions. These resources enable both novice designers professional event planners to create polished invitations efficiently.

Popular Design Software Options

Professional design software provides robust capabilities for creating custom event cards:

  • Adobe Creative Suite

  • Illustrator: Creates scalable vector graphics for logos symbols
  • InDesign: Specializes in layout design typography management
  • Photoshop: Handles photo editing image manipulation
  • User-Friendly Alternatives

  • Canva: Offers drag-drop interface with 10,000+ event card templates
  • Figma: Enables real-time collaboration with cloud-based design tools
  • Affinity Designer: Provides professional features at a lower cost point
Software Best For Key Features
Canva Beginners 10,000+ templates drag-drop interface
Adobe Suite Professionals Advanced tools comprehensive control
Figma Teams Real-time collaboration cloud storage

Customizable Template Resources

Template marketplaces offer pre-designed event card layouts for quick customization:

  • Online Marketplaces

  • Creative Market: Features 5,000+ premium event card templates
  • Envato Elements: Provides unlimited downloads from 50,000+ designs
  • Template.net: Offers both free premium event card options
  •  
  • Moo: Includes customizable templates with print ordering
  • VistaPrint: Features industry-specific event card designs
  •  
Platform Template Count Price Range
Creative Market 5,000+ $10-50
Envato Elements 50,000+ $16.50/month
Template.net 1,000+ $5-25

Conclusion

Creating an exceptional event card requires careful consideration of design fundamentals typography color psychology and visual elements. By applying these principles you’ll craft invitations that not only inform but also captivate your audience.

Whether you choose digital or print format ensuring proper implementation of design elements will help you create a lasting impression. With the right tools and templates at your disposal you’re well-equipped to design event cards that perfectly capture the essence of your occasion.

Remember that a well-designed event card serves as both an invitation and a preview of the experiences your guests can anticipate. Let your creativity shine through while maintaining professional standards and your event cards will surely stand out.

 

iStock Promo Code: Save Up to 33% on Premium Stock Photos [2024 Deals & Tips]

We’ve all been there – staring at our screens desperately searching for that perfect stock photo while our wallets cry at the sight of those premium prices. But what if we told you there’s a way to snag those stunning visuals without breaking the bank?

What Is iStock and Why Use It

iStock stands as Getty Images’ powerhouse platform, offering a vast collection of 100+ million premium photos, vectors, videos, and audio files. It’s like having a digital art gallery at your fingertips, minus the security guards following you around.

Here’s what makes iStock a go-to resource:

  • Diverse Content Types: Browse through high-resolution photos, illustrations, vectors, videos, and audio files
  • Quality Control: Each file undergoes rigorous inspection to maintain professional standards
  • Legal Protection: Download files with complete licensing protection for commercial use
  • Simple Search: Find specific content using advanced filters, categories, and keywords
  • Flexible Plans: Choose between pay-as-you-go credits or monthly subscriptions

Unlike other platforms, including Adobe Stock for Creative, iStock maintains a perfect balance between quality and affordability. The platform features two distinct collections:

Collection Type Image Quality Price Range
Signature Premium, Exclusive $24-$33/image
Essentials Standard, Popular $12-$15/image

The best part? We can snag these professional visuals at even lower prices using an iStock promo code. Think of it as getting VIP access to a premium content warehouse without the premium price tag.

  • Regular Updates: Fresh content added daily
  • Multi-device Access: Download files from any device
  • Quick Downloads: Instant access to purchased content
  • Customizable Boards: Create collections for different projects
  • Clear Attribution: Transparent credit requirements for each asset

Types of iStock Subscriptions Available

iStock offers flexible subscription options that cater to different content needs and budgets. Let’s explore these options with a dash of humor because who doesn’t love saving money while getting amazing visuals?

Credit Packs

Credit packs are like a digital piggy bank for iStock downloads. Here’s what makes them special:

  • Purchase credits in bundles of 1 to 300 credits
  • Credits remain valid for 12 months from purchase date
  • Download any combination of photos vectors or illustrations
  • Use iStock promo codes to get bonus credits on larger packs
  • Perfect for occasional users or one-time project needs
Credit Pack Size Standard Price Typical Price with Promo Code
1 Credit $12 $8-10
30 Credits $240 $180-200
60 Credits $400 $320-360
  • Choose between 10 50 or 750 downloads per month
  • Access both Essential and Signature collections
  • Share downloads among team members
  • Rollover unused downloads to the next month
  • Cancel anytime without penalties
Subscription Type Monthly Downloads Starting Price
Basic 10 $29
Standard 50 $99
Premium 750 $199

How to Find Valid iStock Promo Codes

Finding legitimate iStock promo codes feels like a treasure hunt, but we’ve got the map to guide you through this money-saving adventure. Let’s explore the most reliable places to discover active discount codes that actually work.

Official iStock Deals Page

The official iStock deals page serves as your one-stop destination for verified promo codes. Here’s what you’ll find:

  • Sign up for the iStock newsletter to receive exclusive promo codes
  • Check the homepage banner for featured promotional offers
  • Browse the dedicated deals section for bundle discounts
  • View current credit pack promotions with automatic discounts
  • Access special rates for first-time subscribers
  • Monitor limited-time flash sales on specific content categories
  • Black Friday deals offering up to 25% off on credit packs
  • Cyber Monday specials with increased subscription discounts
  • Holiday season promotions during December
  • New Year sales featuring annual subscription discounts
  • Spring cleaning deals on popular image categories
  • Summer flash sales with 24-hour discount codes
Season Average Discount Duration
Black Friday 25% 1 week
Cyber Monday 20% 24 hours
Holiday Season 15% 2 weeks
New Year 30% 1 week
Spring 10% 3 days
Summer 15% 24 hours

How to Apply an iStock Promo Code

  1. Log into Your Account
  • Navigate to istock.com
  • Click the “Sign In” button in the top-right corner
  • Enter your login credentials
  1. Select Your Content
  • Browse through millions of available assets
  • Click the download button next to your chosen image
  • Select your preferred purchase option (credits or subscription)
  1. Enter the Promo Code
  • Look for the “Apply Promo Code” or “Have a Promo Code?” link
  • Click to expand the promo code field
  • Type or paste your iStock promo code into the box
  • Hit “Apply” to activate the discount
  1. Verify the Discount
  • Check that the total amount reflects the expected discount
  • Confirm the promotion details in your cart
  • Remove and re-enter the code if needed
  1. Complete Your Purchase
  • Choose your preferred payment method
  • Review the final discounted price
  • Click “Complete Purchase” to finish
Common Promo Code Issues Quick Fix
Case sensitivity Type exactly as shown
Expired code Check expiration date
Invalid format Remove extra spaces
Usage limits Verify one-time vs. multiple use

Remember: One promo code per purchase works on iStock, so choose the highest value discount code for maximum savings.

Best Ways to Save Money on iStock

We’ve uncovered the smartest strategies to stretch your stock photo budget on iStock without compromising on quality. Here’s how to maximize your savings while building your creative arsenal.

Bundle Deals

iStock’s bundle deals pack a serious punch for your wallet. Credits purchased in bulk offer savings up to 33% off regular prices for packages of 60+ credits. The larger bundles include:

  • 60 credits at $520 ($8.67 per credit)
  • 150 credits at $1,200 ($8.00 per credit)
  • 300 credits at $2,400 ($7.50 per credit)
Credit Bundle Total Cost Cost Per Credit Savings
60 credits $520 $8.67 20%
150 credits $1,200 $8.00 26%
300 credits $2,400 $7.50 33%

Referral Programs

iStock’s referral program turns you into a savings superhero. Here’s what you get:

  • $20 credit for each new referred customer
  • Referred friends receive 10% off their first purchase
  • No limit on referral earnings
  • Credits automatically added to your account
  • Referral bonuses stack with other promotions

These savings opportunities combined with iStock promo codes create a powerful combo for maximum discounts. Each referral adds up, making it a fantastic way to build your image library while keeping costs down.

Common Issues When Using Promo Codes

Let’s face it – even with an iStock promo code in hand, things don’t always go as smoothly as we’d like. Here are the most frequent hiccups users encounter:

  1. Code Case Sensitivity
  • Entering “SAVE20” instead of “save20” leads to rejection
  • Mixing uppercase and lowercase characters causes validation errors
  • Copy-pasting from emails sometimes adds hidden characters
  1. Expired Codes
  • Codes typically expire after 30 days
  • Seasonal promotions end at specific times
  • Holiday deals vanish faster than leftover pizza at midnight
  1. Usage Restrictions
  • Some codes work only for credit purchases
  • Others apply exclusively to subscription plans
  • First-time customer codes can’t be used on existing accounts
  1. Minimum Purchase Requirements
  • Credit pack codes need minimum credit amounts
  • Subscription codes require specific plan selections
  • Bundle deals demand multiple items in cart
  1. Technical Glitches
  • Browser cache issues block code application
  • Payment processing timeouts clear applied codes
  • Website maintenance periods affect code validation
  1. Multiple Code Attempts
  • System blocks accounts after numerous invalid attempts
  • Only one code works per transaction
  • Combining codes isn’t possible, even if we wish it were
  1. Geographic Limitations
  • Some codes work only in specific countries
  • Regional promotions exclude certain territories
  • Currency differences affect code validity

These obstacles might seem like speed bumps on the road to savings, but understanding them helps avoid those frustrating “invalid code” messages that make us want to throw our keyboards out the window.

Conclusion

We’ve shared all our sneaky secrets to scoring sweet deals on iStock – and boy, what a wild ride it’s been! Now you’re armed with enough money-saving tricks to make any penny-pincher proud. From credit bundles to referral programs we’ve got you covered like a perfectly-composed stock photo.

Remember folks: hunting for promo codes isn’t just about saving money – it’s about feeling like a savings superhero in a world of expensive visuals. So go forth and conquer those discounts! Your wallet will thank you and your projects will shine brighter than a model’s perfectly whitened smile in a dental ad photo.

Happy hunting and may the savings be ever in your favor! 🎯


How to Give Photo Credit on Your Blog: A Complete Guide for Content Creators

In today’s digital age, giving proper credit for photos we use in our blog posts isn’t just good etiquette – it’s essential for legal and ethical reasons. Whether we’re using professional photographs or royalty-free images, acknowledging the creator helps build trust with our readers and protects us from potential copyright issues.

Crediting photos properly can be done in several ways, and it’s crucial to understand the best practices for attribution. Not only does proper photo credit enhance our brand image by showing professionalism and respect for creators, but it also helps build valuable relationships within the creative community. We’ve found that readers appreciate transparency, and proper attribution adds credibility to our content while fostering a culture of mutual respect between content creators and photographers.

Understanding Photo Credits for Blogs

Photo credits establish ownership recognition for images used in blog posts. This essential practice protects content creators while maintaining professional integrity in digital publishing.

What Is Photo Credit and Why It Matters

How to give photo credit on blog as formal acknowledgment of an image’s creator or source on a blog post. Proper attribution builds trust with photographers, readers, and the creative community. Here’s what makes photo credits important:

  • Creates transparency about image ownership
  • Establishes credibility for blog content
  • Builds relationships with photographers
  • Enhances brand reputation
  • Provides source verification for readers
  • Facilitates image tracking

Legal and Ethical Considerations

Proper photo attribution protects bloggers from copyright infringement claims. The legal implications of using uncredited images include:

Copyright Violation Consequences Potential Costs
Legal Fees $2,500 – $25,000
Statutory Damages Up to $150,000
DMCA Takedown Notices Site Removal

Key ethical aspects include:

  • Respecting intellectual property rights
  • Supporting creative professionals’ livelihoods
  • Maintaining industry professional standards
  • Promoting fair use practices
  • Contributing to digital content integrity
  • Fostering collaborative relationships

Including photo credits demonstrates respect for creators’ work while protecting blogs from legal complications. Ethical attribution practices contribute to a sustainable creative ecosystem where both content creators and photographers benefit from proper recognition.

Essential Elements of a Photo Credit

Photo credits follow a structured format known as TASL (Title, Author, Source, License) to ensure complete attribution. Here’s what you need to include when giving photo credit on your blog.

Required Attribution Information

  • Title: Include the complete name of the photograph or artwork
  • Author: List the photographer’s or artist’s full name
  • Source: Add the specific URL where the image is hosted
  • License: Specify the type of Creative Commons or other license applied
  • Date: Include the year of creation or publication when available
  • Place credits directly beneath or near the image
  • Use consistent formatting across all blog posts
  • Structure the credit in this order: “Image Title by Author Name via Source (License)”
  • Include hyperlinks to the original source URL
  • Format credits in a distinguishable font style or size
  • Create alt text that incorporates essential credit information
  • Add visible watermarks or embedded text on images to maintain attribution
Credit Element Example Format Purpose
Basic Format “Photographer by Hernán Piñera” Quick identification
Full Format “Title by Author via Source (CC BY-SA 2.0)” Complete attribution
Alt Text “Image Title – Credit: Author Name” Accessibility

Best Practices for Blog Photo Attribution

Photo attribution requires strategic placement and careful attention to detail for maximum effectiveness. Here’s how to handle photo credits correctly on your blog.

Where to Place Photo Credits

  • Position credits immediately below the image in a clear, readable font
  • Insert credits within image captions using the format “Photo by [Photographer Name]”
  • Add credits directly on the image in a corner when using full-bleed photos
  • Place attribution details in the image’s alt text or metadata
  • List multiple photo credits at the end of the post in a dedicated section
  • Omitting essential TASL (Title, Author, Source, License) components
  • Using incorrect license information or outdated source links
  • Placing credits in unreadable locations or with poor contrast
  • Failing to include hyperlinks to original sources
  • Mixing different attribution formats within the same post
  • Copying image attribution from third-party websites without verification
  • Using generic credits like “Image from Google” or “Found on Pinterest”
  • Neglecting to update credits when replacing or modifying images
  • Assuming “free” images don’t require attribution
  • Making credits too small or visually insignificant to read
Attribution Element Required Information
Title Original image name or description
Author Photographer’s full name or username
Source Original website URL or platform
License Specific license type & restrictions

Different Types of Image Licenses

Image licenses establish specific terms for using photographs on blogs or websites. Understanding these licenses helps determine the correct attribution format when giving photo credit on blogs.

Creative Commons Images

Creative Commons licenses provide flexible options for sharing creative work while protecting creators’ rights. Here are the primary CC license types:

  • CC BY: Allows distribution with proper attribution to the original creator
  • CC BY-SA: Permits sharing with attribution, requiring derivative works to use the same license
  • CC BY-ND: Enables redistribution with credit, prohibiting modifications
  • CC BY-NC: Allows non-commercial use with attribution
  • CC BY-NC-SA: Permits non-commercial sharing with attribution, requiring same license terms
  • CC BY-NC-ND: Enables non-commercial use with credit, prohibiting modifications
  • Rights-Managed (RM):
  • Restricts usage based on specific parameters
  • Requires detailed attribution as specified by the provider
  • Sets limits on distribution scope time period
  • Royalty-Free (RF):
  • Allows multiple uses after one-time payment
  • Requires attribution according to platform guidelines
  • Permits broader usage rights
License Type Attribution Required Commercial Use Modifications Allowed
CC BY Yes Yes Yes
CC BY-SA Yes Yes Yes
CC BY-ND Yes Yes No
Rights-Managed Yes Limited Varies
Royalty-Free Varies Yes Usually

Platform-Specific Attribution Guidelines

Photo attribution requirements vary across different platforms. Each platform offers unique features and methods for crediting images properly while maintaining professional standards.

WordPress Best Practices

WordPress provides multiple options for adding photo credits to blog posts. Insert image credits in the caption field directly beneath photos using the built-in media library features. Add HTML credit tags in the alt text field or create custom fields specifically for image attribution using popular plugins like Advanced Custom Fields.

WordPress Credit Features Implementation Method
Caption Field Built-in media library
Alt Text Attribution HTML editing
Custom Credit Fields Plugin integration
Media Library Metadata Direct image properties

Social Media Photo Credits

Social media platforms offer platform-specific tools for image attribution. Tag photographers using the @ symbol on platforms like Instagram or Facebook when the original content creators have accounts there. Include credit information in post captions with clear attribution statements.

Platform Attribution Method
Instagram @ mentions in caption
Facebook @ tags + caption credit
Twitter @ mentions + link
Pinterest Source URL + credit text

Key attribution elements for social media:

  • Tag original photographers using platform-specific mention tools
  • Include source links when the platform allows
  • Place credits in visible caption areas
  • Use platform hashtags to increase credit visibility
  • Maintain consistent credit formatting across all posts
  • Instagram: Profile tags + caption credits
  • Facebook: User tags + embedded source links
  • Twitter: Compressed attribution with handles
  • Pinterest: Source website links + credit overlay

Conclusion

Giving proper photo credit isn’t just about following rules – it’s about building trust and respecting creativity in the digital world. We’ve explored how proper attribution protects our work while supporting the photography community that makes our content shine.

By implementing these photo crediting best practices we can create a more transparent and ethical blogging environment. Remember that taking a few extra minutes to properly credit images will protect us from legal issues and help us build lasting relationships with talented photographers.

Let’s make photo attribution a natural part of our blogging routine. When we credit images correctly we’re not just following good practices – we’re contributing to a thriving creative ecosystem that benefits everyone.


Adobe Stock for Creative Cloud Users

What’s your favorite Creative Cloud desktop software application? Which stock photo agency do you get your images from? With the launch of Adobe Stock a little over a year ago, you now have a whole new collection to explore. The stock site has some unique features that make it worth considering for Creative Cloud users, like you.

Adobe first acquired Fotolia in 2014, but kept it as a separate stock agency. Then, it introduced Adobe Stock as a stand-alone stock site, which is now the largest in the industry. Integrated with Creative cloud software applications, customers had access to over 40 million images submitted by Fotolia contributors through the new site, click here.

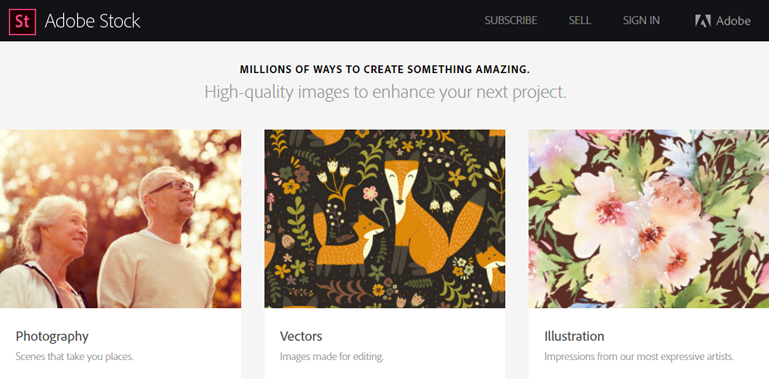
Now, Adobe Stock offers both stock images and footages. Its recent merge with Corbis expanded its library to a whooping 200 million of high quality content. It also features a very attractive website that is built into the Creative Cloud software. That’s right! You can search a wide variety of images inside your favorite CC desktop application.

Here is a short Adobe Stock review:

  • The largest stock media library in the industry with over 200 million content.
  • Available in many countries and 20 languages so you can search in your own words.
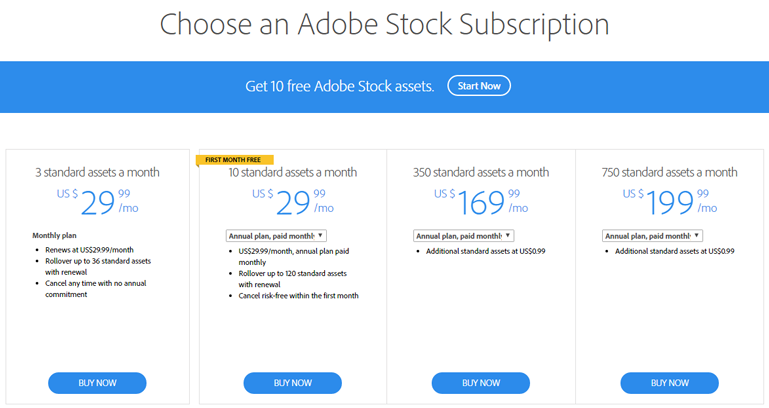
  • Simple pricing starts at $9.99 per image and $79.99 per video.
  • Several subscription options with 10, 350 and 750 images per month.
  • Integration with Adobe software platform for easy design comping and licensing.
  • Various sorting options for more efficient searches.
  • Accepts all major credits cards and PayPal.

Signing up with Adobe Stock brings a number of benefits, but it also come with a disadvantage. At this point, the stock site does not offer an option for Extended License. If you need images for multi-seat usage, unlimited print productions, and resale, you can purchase it through Fotolia.

Adobe Stock is a major player in the stock media industry. It has one of the largest libraries and simplest pricing to cater to your unique creative needs. With the integration to Creative Cloud software, you can save more time and money working with comp images before actually purchasing them.